How to create and mount a CD image in windows
How to create and mount a CD image in windows
January 19th, 2007
A cd image is an entire cd’s contents in a single file. Mounting a cd image will allow you to access the contents of the cd as would any other drive in windows. Why would you want to create a cd image? Certain software, including a lot of games, require that you insert their cd into your cdrom drive before you can use the software. Creating a cd image allows you to use this software without having to repeatedly insert and remove cds. In this post I look at how to create and mount a cd image in Windows.
Creating a CD image in Windows
To create a CD image you will need to download and install the free iso recorder software.
Once you have installed this program you insert a cd, right click your
CD ROM drive’s icon in my computer and select "Copy cd to image".
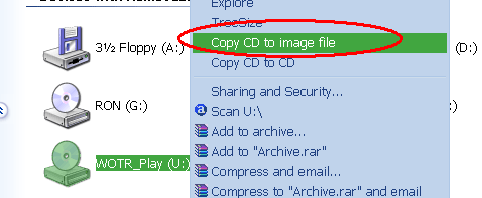 Copying a CD to an image file
In
the next window you just insert the path to a new iso file for your cd
image. Click next and iso recorder should begin to copy your cd to an
image file.
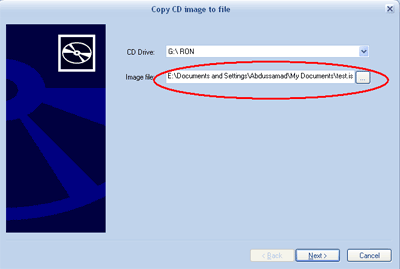 Specifying the path and name of the cd image file
Mounting a cd image in windows
Windows does not offer out of the box functionality for mounting
disk images like Linux. But Microsoft does make available an
unsupported free utility that can create virtual CD ROM drives and
mount cd images. MS calls it the Virtual CD ROM Control panel or, confusingly enough, VCD for short. Using VCD is pretty easy. Microsoft includes a readme.txt file that explains how you install and use the software.
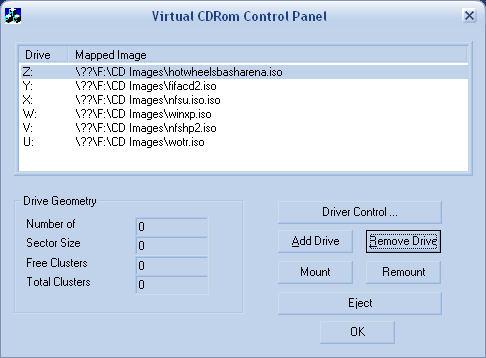 The VCD utility window
The add drive button allows you to add virtual cd rom drives to Windows. You then mount images using the mount button. Simple!
1) http://www.ezbsystems.com/ultraiso/
UltraISOHandle CD and DVD Images with Ease!
$29.95 USD  Buy Now
  Free Trial

Duplicate Disc to CD/DVD Image Build Files/Folders to One ISO File Organize and Manage Efficiently Edit and Convert ISO File in Many Format Make Bootable CD/DVDs Create/Edit Audio CD Image Along with the large capacity hard disk popularity, people were already used to copying compact discs to CD/DVD image files, generally used is the famous ISO 9660 international standards format, therefore CD/DVD image files are called ISO files. Because the ISO file retained complete data information of the compact disc (including compact disc boot information), you were allowed the convenience to use commonly used CD/DVD burning software (for example Nero-Burning ROM ) to record the disc with your CD-R/RW or DVD-R/RW over and over forever, it can also be used directly through Virtual CD/DVD-ROM drive software (for example Daemon-Tools ) .UltraISO is an ISO CD/DVD image file creating/editing/converting tool and a bootable CD/DVD maker , it can directly edit the CD/DVD image file and extract files and folders from it, as well as directly make ISO files from your CD/DVD-ROM or hard disk. At the same time, you can maintain the ISO bootable information, thus creating your own bootable CD/DVDs. You now have the power to make and edit your own ISO files, and then burn them to CD/DVD for your own needs.
UltraISO is in sole possession of the intellectualized ISO document format analyzer, it can process at the present time almost all types of image files, including ISO and BIN, it may even support new image files which are yet to be created. UltraISO can open these image files, directly extract files and folders, edit it and convert other image files to the standard ISO format.UltraISO uses the double window unification user contact interface, you have the choice to only use the quick buttons and/or the mouse Drag & Drops, you can handle any CD/DVD image file easily.System Requirement
- Windows 7/2008/Vista/2003/XP (32bit and 64bit), Windows 2000, ME, 98SE, 98, or Windows NT4.0 SP6a+ operating system .
- Intel Pentium 166MHz or above.
- 64MB memory.
- At least 10MB free hard disk space .
- CD-ROM, CD-R/RW, DVD-ROM, the DVD-R/RW driver (copy compact disc image needs).
- Mouse.
Main Features
- Can directly edit the ISO image file.
- Can directly extract files and folders from ISO image file
- Can add / delete /create new directory /rename ISO file image content.
- Can make ISO file from hard disk document.
- Can create CD/DVD image from CD/DVD-ROM, maintain bootable information.
- Can process the compact disc boot information, you can directly add/remove/extract boot image of the ISO image.
- Supports nearly all known CD/DVD image file formats (.ISO, .BIN, .IMG, .CIF, .NRG, .MDS, .CCD, .BWI, .ISZ, .DMG, .DAA, .UIF, .HFS and so on) , and can convert them to the industry standard and widely supported ISO image format.
- May directly set the file/folder to hidden attribute
- Supports ISO 9660 Level1/2/3 and Joliet extension
- Automatically optimizes the ISO image file structure, saves the disc space.
- Supports the shell document type integration, Open Image files through double clicking them or the Right Click menu of the mouse with the open dialog.
- The double window user interface is extremely convenient to use.
- There are rich add-on tools, you can create ALL in 1 bootable compact discs, CD/DVD image file management, even the virtual CD/DVD drive , those functions are really powerful.
How can I write (burn) ISO files to CD or DVD? - Petri IT ...
How can I write (burn) ISO files to CD or DVD?
Daniel Petri - January 16, 2009
Printer Friendly Version
ISO files are actually images of complete CDs or DVDs compiled as one whole image file (*.iso), just like Ghost does for hard disks and partitions. ISO images can be loaded into several different CD/DVD recording software packages to create CDs or DVDs.
New: Create or Burn Any .ISO File to CD/DVD If you're not 'techie', or need to burn an ISO to DVD rather than CD, check out iWellsoft's Power ISO utility.
This slick utility lets you burn ISO's to CDs, DVDs, and lets you create your own backup ISO's too!
Get the Power ISO Tool Download Here...
ISO Recorder Power Toy (Freeware)
Update: ISO Recorder is now compatible with Windows Vista and Windows 7.
ISO Recorder is a Windows XP freeware utility that uses native Windows XP functions to write images to a CD. You can download this utility from the author's Web page. When the program is installed, it is automatically associated with the ISO file extension in Windows Explorer. For more information about this utility, visit the author's Web page at http://isorecorder.alexfeinman.com/isorecorder.htm
Steps to create a CD if you have installed ISO Recorder Power Toy:
- Download the ISO CD or DVD image to a folder on your computer.
- Insert a blank CD or DVD in your CD-RW drive.
- Start Windows Explorer.
- Locate the ISO file, right-click the file name, and then click Copy image to CD to open the ISO Recorder Wizard.

- Follow the steps in the wizard to write the image to the CD.
- You can also right-click your CD-R drive and choose Copy Image to CD.

- In the new window browse to the ISO file and click Next.

"Small and maybe valuable tip for the ‘How can I write ISO files to CD?' tip. This power tool works only on files with ISO extension. There're some ISO files with IMG extension (notably MSDN's distribution files). Change the extension to .ISO and this power tool will work as advertised. There maybe other file formats that are ISO format and are called something else…"
Thanks!
EasyCD/DVD Creator 2009 (Roxio)
You can use EasyCD/DVD Creator to create a CD or DVD from an ISO file. You must purchase this program from Roxio. When the program is installed, it is automatically associated with the ISO file extension in Windows Explorer. For more information about this program, visit the Roxio Web site at: www.roxio.com
Steps to create a CD if you have installed EasyCD Creator:
- Download the ISO CD/DVD image to a folder on your computer.
- Insert a blank CD, DVD, or Blu-Ray disc in your CD-RW/DVD-RW/Blu-Ray drive.
- Start Windows Explorer.
- Locate the ISO file, right-click the file name, and then click Open to start Creator 2009.
- In the Write Method section of the CD/DVD Creation Setup dialog box, click Disk at Once for optimum recording performance.
- Click OK to write the image to the CD/DVD.
CDBurn.exe from the XP Support Tools
You can use CDBurn.exe that is included in the Windows Server 2003 Support Tools (read Download Windows 2003 Reskit Tools for more info). ISO CD-ROM Burner Tool (CDBurn) is a command-line tool that allows the user to write (burn) data images from image files located on the hard drive to compact disc (CD) recordable (CD-R) and CD rewritable (CD-RW) media. The data image can be any kind of data, even raw data. This tool can also be used to erase CD-RW media. Example: Burn a CD From an Image File When a Drive Letter is Assigned to the CD Burner. Type the following at the command line:
cdburn.exe d: c:dotnet_usa_3678.IDS_x86fre_srv.iso
Press ENTER. Output similar to the following is displayed:
Number of blocks in ISO image is 3d1d6
25.6% done
45.2% done
55.3% done
68.9% done
89.3% done
100.0% done
Finished Writing Synchronizing Cache: burn successful!
Notes:
The drive letter assigned to the burner in this example is D and the image file being written is located at c:dotnet_usa_3678.IDS_x86fre_srv.iso. The default burn speed for this tool is 4x. The maximum burn speed is limited by the maximum speed of the burner. Use the speed parameter to set the burn speed. The max parameter sets the burn speed of the CD burner to maximum.
Summary
This article has discussed several methods for burning iso files to different media types, including free iso burners and some commercial iso writers. The .iso burned copies are often used to duplicate entire CD/DVD's in their original file structure without having to worry about individual files.
Related Articles
-
Make ISO CD Image From Folder
Make ISO CD Image From Folder
ISO Creator is an opensource software that allows anyone to create an ISO CD image from a folder. You can also create ISO with virtual files if a tree representing a directory structure is given.
It can not create ISO from files, you will have to add the files inside one folder and then convert that folder to ISO format using this tool.
Overall, it requires only three steps- Enter the path where you want to save the ISO file, given the Volume a name, and choose the folder that you want to convert to ISO. You can even convert a drive into ISO image.

The process to create the ISO image will depend on the number of files and the total folder size. Having said that, the progress was quite fast while we tested it.
Download ISO Creator
It works on Windows XP, Windows Vista, Windows Server 2003/2008, and Windows 7. Enjoy!
How to Copy or Burn a CD Using Windows Media Player - wikiHow
So, you would like to learn how to burn your favorite songs and/or video clips onto a CD on Windows Media Player, eh? Well, guess what? All you have to do is just follow the steps as usual. Oh, and try to look at the tips and warnings as usual, too.
Edit Steps
- 1If you don't have your favorite songs on Windows Media Player, simply download some, or import some from one of your favorite CDs. Just insert your CD into the CD drive, or CD-RW drive, go to Windows Media Player, copy the desired tracks by clicking on the checkboxes, going to "Copy from CD," or "Rip," and press "Copy," or "Rip Music."

 If you don't have your favorite songs on Windows Media Player, simply download some, or import some from one of your favorite CDs.
Download Office 365 Free Trial
Accesible Anywhere, Affordable & Safe. Sign up for a Free Trial Now!
microsoft.com/free-trial-office365 - 2When the tracks are copied to the Media Library, go to "Copy to CD or Device," or "Burn," insert a blank CD, and press "Copy," or "Burn CD."

- 3When the burning or copying process is complete, the disc should most of the time eject automatically. If it doesn't, you can easily eject it yourself. It should play on a CD player.
When the burning or copying process is complete, the disc should most of the time eject automatically.
CD Copy Protection Utilities/Tools For Burning A 1:1 Copy ...
Make Your Own Copy-Protected CD with Passive Protection
DECEMBER 15, 2005 BYHere’s a great gift idea just in time for the holidays: Make your friends and relatives their very own copy-protected CDs using the same industrial-grade passive protection technology built into XCP and Macrovision discs.Passive protection exploits subtle differences between the way computers read CDs and the way ordinary CD players do. By changing the layout of data on the CD, it’s sometimes possible to confuse computers without affecting ordinary players — or so the theory goes. In practice, the distinction between computers and CD players is less precise. Older generations of CD copy protection, which relied entirely on passive protection, proved easy to copy in some computers and impossible to play on some CD players. For these reasons, copy protection vendors now use active protection — special software designed to block copying.Discs with XCP or Macrovision protection employ active protection in conjunction with a milder form of passive protection. You can create your own CD with exactly the same passive protection by following a straightforward five-step procedure. I’ll describe the procedure here, and then explain why it works.What you’ll need:- A computer running a recent version of Windows (instructions are Windows-specific; perhaps someone will write instructions for MacOS or Linux)
- Nero, a popular CD burning application
- CloneCD, an advanced disc duplication utility
- Two blank recordable CDs
Step 1: Burn a regular audio CDStart Nero Burning ROM and create a new Audio CD project. [View] Add the audio tracks that you want to include on your copy-protected disc. [View] When you’re ready to record, click the Burn button on the toolbar. In the Burn tab, make sure “Finalize disc” is unchecked. [View] Insert a blank CD and click Burn. Be careful not to infringe any copyrights! For loads of great music that you can copy legally, visit Creative Commons.Step 2: Add a data session to the CDStart another Nero compilation, this time selecting the “CD-ROM ISO” project type. In the Multisession tab, make sure “Start Multisession disc” is selected; and in the ISO tab, make sure Data Mode is set to “Mode 2 / XA”. [View] Add any files that you want to be accessible when the CD is used in a computer. You might include “bonus” content, such as album art and lyrics. [View] For a more professional effect, consider adding the installer for your favorite spyware application and creating an Autorun.inf file so it starts automatically. When you’re finished, click the Burn toolbar button. Insert the audio CD you created in Step 1, and click Burn. [View] Nero should warn you that the disc you’ve inserted is not empty; click Yes to add your data files as a second session. [View]At this point, you’ve created a CD that contains both audio tracks and data files. The data files you put on the CD should be visible in Windows Explorer (in My Computer, right click the CD icon and click Open) and the audio tracks should be rippable with your favorite audio player. To add passive copy protection, you’ll need to modify the layout of the data on the disc so that the audio tracks are more difficult to access.Step 3: Rip the CD as a CloneCD image fileMake sure the CD you just created is still in the drive and start CloneCD. Click the “Read to Image File” button. Select your drive and click Next. Choose “Multimedia Audio CD” and click Next. [View] Select an easy to find location for the image file and click OK to begin ripping.Step 4: Modify the image file to add passive protectionThe CloneCD image you created in step 3 actually consists of three files with names ending in .CCD, .IMG, and .SUB. The .CCD file describes the layout of the tracks and sessions on the CD. You’ll edit this file to add the passive protection.Start Windows Notepad and open the .CCD file. Modifying the file by hand would be tedious, so I’ve created an online application to help. Copy the entire contents of the file to the clipboard and paste it into this form, then click Upload. Copy the output from the web page and paste it back into Notepad, replacing the original file contents. [View] Save the file and exit Notepad.Step 5: Burn the modified image to create a copy-protected CDInsert a blank CD and start CloneCD again. Click the “Write From Image File” button. Select the image file you modified in step 4 and click next. Select your CD recorder and click Next. Select “Multimedia Audio CD” and click OK to begin burning. [View]That’s it! You’ve created your very own copy-protected CD.Now it’s time to test your disc. If everything worked, the files from the data session will be visible from My Computer, but the audio tracks will not appear in Windows Media Player, iTunes, and most other mainstream music players. The CD should play correctly in standalone CD players.How it works. To see how this form of passive protection works, you can examine the layout of the CD you created. Start Nero and select Disc Info from the Recorder menu. You should see something like this:(The exact number of tracks you see will depend on how many songs you included.)Notice that the tracks are grouped into two sessions — essentially two independent CDs burned onto the same disc. Unprotected CDs that combine audio and data files contain audio tracks in the first session and a single data track in the second. The only difference in the passive protected CD you just created is that the second session contains two tracks instead of one.You added the extra track (shown in yellow) when you edited the disc image in step 4. This simple change makes the audio tracks invisible to most music player applications. It’s not clear why this works, but the most likely explanation is that the behavior is a quirk in the way the Windows CD audio driver handles discs with multiple sessions.For an added layer of protection, the extraneous track you added to the disc is only 31 frames long. (A frame is 1/75 of a second.) The CD standard requires that tracks be at least 150 frames long. This non-compliant track length will cause errors if you attempt to duplicate the disc with many CD drives and copying applications.Caveat emptor. Yes, your copy-protected CD is “industrial strength” — XCP and Macrovision employ exactly the same passive protection — but even the pros have their limitations. There are many well-known method for defeating this kind of passive protection, such as:- Enhanced software – Advanced CD ripping programs avoid the Windows CD audio driver altogether and communicate directly with the CD drive. Thus, programs such as EAC are able to rip the tracks without any difficulty. – Better CD copying applications, including Nero, support a recording mode called Disc-at-Once/96; this lets them create an exact duplicate of the protected disc even though the last track has an illegal length.
- Other operating systems – The discs can be ripped with standard software on Macs and on Linux systems. These platforms don’t suffer from the limitation that causes ripping problems on Windows.
- Magic markers – The famous magic marker trick involves carefully drawing around the outer edge of the CD. This blocks out the second session, allowing the disc to be ripped and copied just like an unprotected CD.
And of course, at any time Microsoft could fix the Windows quirk that is the basis for this technique, rendering it completely ineffective.Despite these limitations, who wouldn’t enjoy finding a homemade copy-protected CD in their stocking? They’re a great way to spread holiday cheer while preventing anyone else from spreading it further.
-
-

Wednesday, 2 May 2012
CD image in windows


Subscribe to:
Post Comments (Atom)
No comments:
Post a Comment